
Mon, Dec 13, 2021
Read in 8 minutes

Introduction - In this blog, we’ll be building a RESTful CRUD (Create, Retrieve, Update, Delete) API with Node.js, Express and MongoDB. We’ll use Mongoose for interacting with the MongoDB instance.First we will know about the Express and Mongoose.
I’m assuming that you already know about Express,MongoDb, Mongoose. We will cover most of the coding part with some clear theory.
CRUD is an acronym for Create, Read, Update and Delete. It is a set of operations we get servers to execute (POST, GET, PUT and DELETE requests respectively). This is what each operation does:
● Create (POST) - Make something
● Read (GET)- Get something
● Update (PUT) - Change something
● Delete (DELETE)- Remove something
POST, GET, PUT, and DELETE requests let us construct Rest Api’s.
If we put CRUD, Express and MongoDB together into a single diagram, this is what it would look like:
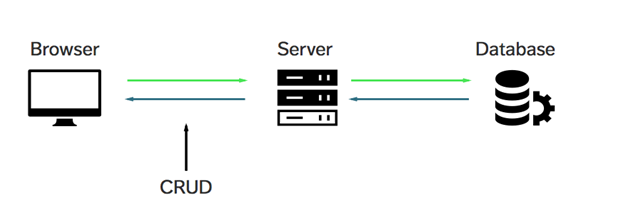
Our Application
In this blog, We will be building a simple Note-Taking application. We will build Rest APIs for creating, listing, editing and deleting a Note.
We’ll start by building a simple web server and then move on to configuring the database, building the Note model and different routes for handling all the CRUD operations.
Finally, we’ll test our REST APIs using Postman.
Also, In this post, we’ll heavily use ES6 features like let, const, arrow functions, promises etc. It’s good to familiarize yourself with these features. I recommend this re-introduction to Javascript to brush up these concepts. Well! Now that we know what we are going to build, We need a name for our application. Let’s call our application UserCrud.
Creating the Application
1. First open up your terminal and create a new folder for the application or you can customize the path location.
$ mkdir user-crud-app
2. Initialize the application with a package.json file.
Go to the root folder of your application and typenpm initto initialize your app with a package.json file.
$ cd user-crud-app
$ npm init
Output Be Like
name: (node-easy-notes-app)
version: (1.0.0)
description:
entry point: server.js
test command:
git repository:
keywords: Express RestAPI MongoDB Mongoose
author: Amar Gupta
license: (ISC) MIT
About to write to /home/amarg3891/user-crud-app/package.json:
{
“name”: “user-crud-app”,
“version”: “1.0.0”,
“description”: “",
“main”: “server.js”,
“scripts”: { “test”: “echo "Error: no test specified"&& exit 1” },
“keywords”: [
“Express”,
“RestAPI”,
“MongoDB”,
“Mongoose”
],
“author”: “Amar Gupta”,
“license”: “MIT”
}
Is this ok? (yes) yes
Above I’ve specified a file named server.js as the entry point of our application. We’ll create server.js file in the root directory of our projectFolder user-crud-app in the next section.
3. Install dependencies for our application
We will need express, mongoose and body-parser modules in our application. Let’s install them by typing the following command -
$ npm install express body-parser mongoose –save
I’ve used –save option to save all the dependencies in the package.json file. The final package.json file looks like this -
{
“name”: “user-crud-app”,
“version”: “1.0.0”,
“description”: “",
“main”: “server.js”,
“scripts”: {
“test”: “echo "Error: no test specified" && exit 1”
},
“keywords”: [
“Express”,
“RestAPI”,
“MongoDB”,
“Mongoose”
],
“author”: “Amar Gupta”,
“license”: “MIT”,
“dependencies”: {
“body-parser”: “^1.19.0”,
“express”: “^4.17.1”,
“mongoose”: “^5.13.7”
}
}
Our application folder now has a package.jsonfile and a node_modules folder -
user-crud-app
└── node_modules/
└── package.json
Setting up the web server
Let’s now create the main entry point of our application. Create a new file named server.js in the root folder of the application with the following contents -
constexpress = require(‘express’);
constbodyParser = require(‘body-parser’);
// create express app
const app = express();
// parse requests of content-type - application/x-www-form-urlencoded
app.use(bodyParser.urlencoded({ extended: true }))
// parse requests of content-type - application/json
app.use(bodyParser.json())
app.use('/', route)
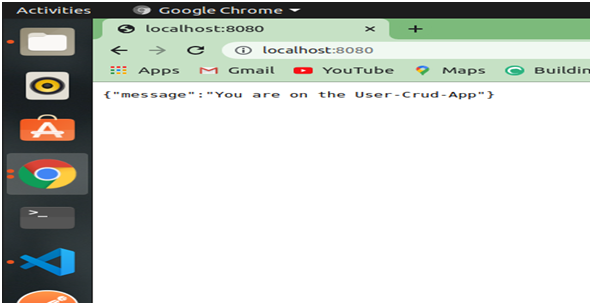
// define a simple route
app.get('/', (req, res) => {
res.json({“message”: “You are on the User-Crud-App”});
});
// listen for requests
app.listen(8080, () => {
console.log(“Server is listening on port 8080”);
});
First, We have to import express and body-parser modules.
Then, We create an express app, and add two body-parsermiddlewares using express’s app.use()method.
A middlewareis a function that has access to the request and responseobjects. It can execute any code, transform the request object, or return a response.
After setting up modules on our root file server.js we will create a simple GET route which returns a message to the clients.
And also we have to set up a port for incoming connections.In this app we will use port 8080 but you can choose of your choice.
So now everything is setted up. We are going to run server http://localhost:8080 to access the route endpoint we just defined in above code.
$ node server.js
Server is listening on port 8080
Configuring and Connecting to the database
Basically we can write our connection code into server.js file but I don’t want to mess code in one file so I’ll create a separate folder config into the root directory where we will keep all the configuration.
$ mkdir config
$ cd config
Now, Create a new file database.config.js inside config folder with the following contents -
module.exports = {
url: ‘mongodb://localhost:27017/User-crud-App’
}
Now we will import the above database configuration in server.js and connect to the database using mongoose. Add the below code to the server.jsfile after app.use(bodyParser.json()) line -
// Configuring the database
constdbConfig = require('./config/database.config.js’);
constmongoose = require(‘mongoose’);
mongoose.Promise = global.Promise;
// Connecting to the database
mongoose.connect(dbConfig.url, {
useNewUrlParser: true
}).then(() => {
console.log(“Successfully connected to the database”);
}).catch(err => {
console.log(‘Could not connect to the database. Exiting now…', err);
process.exit();
});
Let’s run the server and make sure that you’re able to connect to the database -
$ node server
Server is listening on port 8080
Successfully connected to the database
Defining the User model in Mongoose
Next, We will define the User model. Create a new folder called modelinside the root folder of the application.
$ mkdir models
$ cd models
Now, create a file called user.model.jsinside models folder with the below code -
constmongoose = require(‘mongoose’);
constUserSchema = mongoose.Schema({
name: String,
email: String,
address:String
}, {
timestamps: true
});
module.exports = mongoose.model(‘User’, UserSchema);
The User model contains a name ,email and an address field. I have also added a timestampsoption to the schema.
Mongoose uses this option to automatically add two new fields - createdAt and updatedAtto the schema.
Routes Endpoint using Express
And Next is the routes for the User APIs. Create a new folder called routes at the root directory.
$ mkdir routes
$ cd routes
Now, create a new file called user.routes.jsinside routes folder with the below code -
const express = require(‘express’)
const router = express.Router()
constcontrollers = require('../controllers/user.controller.js’);
// Create a new User
router.post('/user’, controllers.create);
// Retrieve all Users
router.get('/users’, controllers.findAll);
// Retrieve a single User with userId router.get('/user/:userId’, controllers.getOne);
// Update a User with userId router.put('/user/:userId’, controllers.updateOne);
// Delete a user with userId router.delete('/user/:userId’, controllers.delete);
module.exports = router
Note that We have added a requirestatement for note.controller.js file. We’ll define the controller file in the next heading . The controller will contain methods for handling all the CRUD operations. It will work like a logic part .
Before defining the controller, let’s first include the routes in server.js. Add the following require statement before app.listen()line inside server.js file.
// Require User routes
const route = require('./routes/user.routes.js’);
The Controller functions
Create a new folder called controllers, then create a new file called user.controller.js inside controllers folder with the following code -
const User = require('../models/user.model.js’);
// Create and Save a new User
User.create= (req, res) => {
// Validate request
if(!User) {
returnres.status(400).send({
message: “User Not Found”
});
}
// Create a User
constuser = newUser({
name: req.body.name || “User”,
email: req.body.email,
address: req.body.address,
});
// Save User in the database
user.save()
.then(data => {
res.send(data);
}).catch(err => {
res.status(500).send({
message: err.message || “Some error occurred while creating the User.”
});
});
};
// Retrieve and return all users from the database.
User.findAll= (req, res) => {
User.find()
.then(User => {
res.send(User);
}).catch(err => {
res.status(500).send({
message: err.message || “Some errors occurred while retrieving users.”
});
});
};
// Find a single user with a userId
User.findOne= (req, res) => {
User.findById(req.params.userId)
.then(User => {
if(!User) {
return res.status(404).send({
message: “User not found with id " + req.params.userId
});
}
res.send(User);
}).catch(err => {
if(err.kind === ‘ObjectId’) {
return res.status(404).send({
message: “User not found with id " + req.params.userId
});
}
returnres.status(500).send({
message: “Error retrieving user with id " + req.params.userId
});
});
};
// Update a user identified by the userId in the request
User.update= (req, res) => {
// Validate Request
if(!User) {
returnres.status(400).send({
message: “User can not be empty”
});
}
// Find User and update it with the request body
User.findByIdAndUpdate(req.params.userId, {
name: req.body.name || “User”,
email: req.body.email,
address: req.body.address,
},{new: true})
.then(User => {
if(!User) {
return res.status(404).send({
message: “User not found with id " + req.params.userId
});
}
res.send(User);
}).catch(err => {
if(err.kind === ‘ObjectId’) {
return res.status(404).send({
message: “User not found with id " + req.params.userId
});
}
returnres.status(500).send({
message: “Error updating User with id " + req.params.userId
});
});
};
// Delete a user with the specified userId in the request
User.delete = (req, res) => {
User.findByIdAndRemove(req.params.userId)
.then(User => {
if(!User) {
return res.status(404).send({
message: “User not found with id " + req.params.userId
});
}
res.send({message: “User deleted successfully!"});
}).catch(err => {
if(err.kind === ‘ObjectId’ || err.name === ‘NotFound’) {
return res.status(404).send({
message: “User not found with id " + req.params.userId
});
}
return res.status(500).send({
message: “Could not delete user with id " + req.params.userId
});
});
};
module.exports = User
Now Let’s Test All Api’s
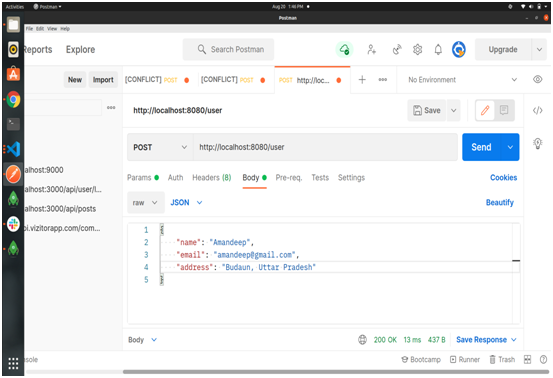
Creating a new User using POST /User API

After passing data into body output be like -
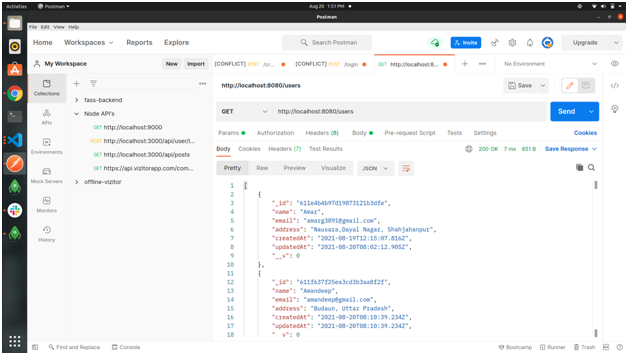
Retrieving all Users using GET /User API

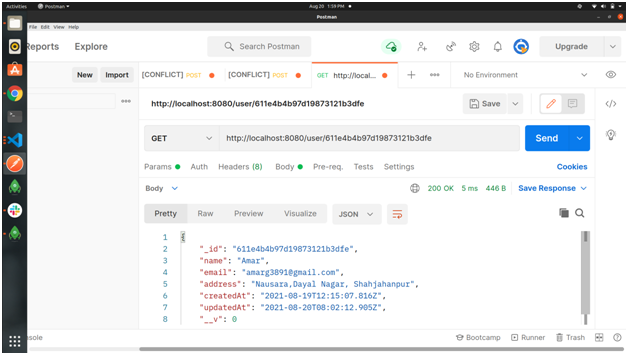
Retrieving a single User using GET /user/:userId API
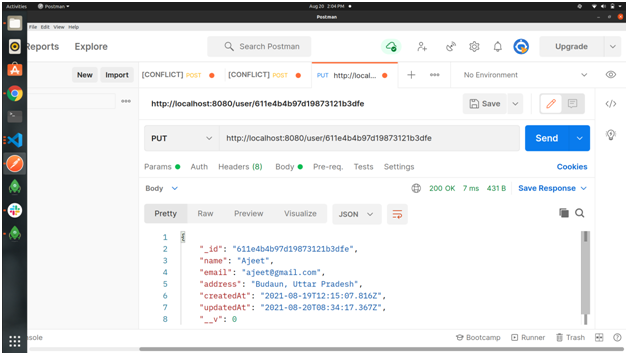
Updating a User using PUT /user/:userId API
After hitting update api output will be -
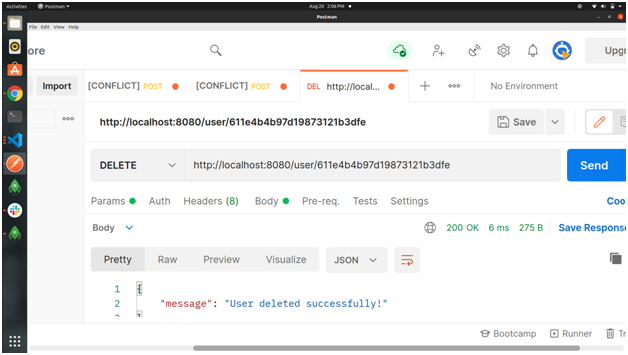
Deleting a User using DELETE /user/:userId API
Conclusion
In this blog, We learned how to build rest apis in node.js using express framework and mongodb.
You can find the code for this blog in my github repository.
Thanks for reading. See you in the next Blog…!